
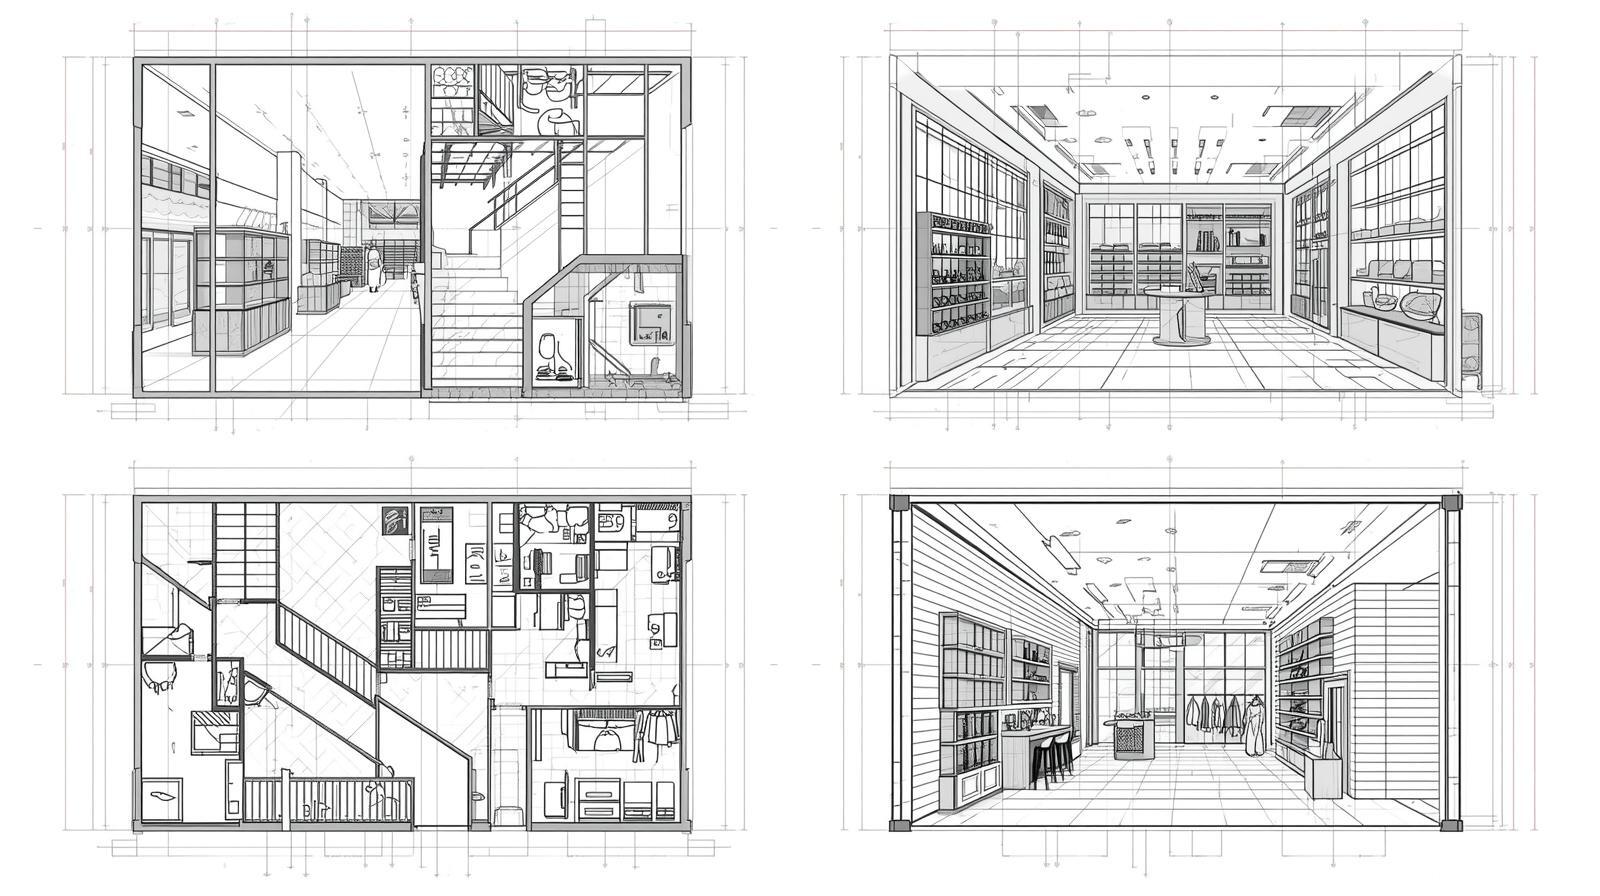
New Store Design Process

DE works with our customers to design a floor plan for your store that best fits your needs and desires while staying within the brand standards of your specific franchise type. Our floor plan will ensure the best cash wrap and fixture layout to promote sales while maintaining an efficient work environment.

Phase 1

1. Customer Contact Form

  • The first step in our Design Process is to fill out our “Customer Contact Form”. This form can be found on our website under the “Store Design” tab, or you can reach out to one of our CSR’s and they can send it to you as well. The Customer Contact Form will have you fill out some basic information that will be used by your account manager to set you up in our accounting system. In the form there will also be a link submit a $500 design deposit that will need to be made prior to any design work taking place.

2 . Site Survey
2 . Site Survey

  • After you have submitted the Customer Contact Form, you will receive a response email labeled "Site Survey" that will contain information on what to do next. In this email we ask that you procure an adequate floor plan (whether it's a CAD file, PDF, hand drawing, etc.) along with about ten photos of the interior the space (make sure to include a picture for each set of windows) and send them to info@d-e.net.

  • The Site Survey email will also include a link to our “Site Survey” form which will have you fill out information regarding details of the space like ceiling type/height, which flooring option you would like, and any special requests you might have for the design of the store.

3 . Preliminary Layout

  • Once we have received your Site Survey submission, $500 design deposit, an adequate drawing of the space, and the requested photos, your designer will begin drawing up the floor plan and fixture layout for the store. They will then send the layout to Winmark for confirmation before sending it to you to get your input. Your designer will go back and forth with you on making all necessary revisions until the desired layout is met. During the Preliminary Layout stage, you can make all of the changes to the layout you would like without incurring any design fees.

4. Store Drawing Agreement

  • Let your designer know once you are satisfied with the layout and they will send you our “Store Drawing Agreement” form. This form will have you confirm which layout you would like us to move forward with and base the rest of our drawings and estimate on. Please note that any revisions to the design after the submission of the Store Drawing Agreement may incur a design fee of $90/hour that will be deducted from your $500 design deposit (there will not be any extra charges beyond the $500 that was deposited).

  • The submission of this form will conclude Phase 1.

Phase 2

1. Complete Store Drawings

  • Once Phase 1 is complete, your designer will begin working on the rest of your store drawings. These drawings will include the floor layout from the preliminary stage, wall elevations, flooring plan, template lighting layout, cash wrap detail, fitting room detail (if applicable), and our Store Design Handbook.

  • Typically, it takes around five business days to complete the drawings. Once the drawings are complete your designer will send them to you via email.

2. Preliminary Estimate
2.  Preliminary Estimate

  • In a separate email from your account manager, you will also receive a Preliminary Estimate that is directly correlated to your store drawings. This estimate will include the supplies, fixtures, flooring, cabinetry, and other items needed for the opening of the store (some necessities will come from other vendors).

  • In the same email you will also receive our Delivery Lead Times Sheet. This document will outline our current shipping lead times of what is included in the estimate so you can begin to brainstorm your delivery schedule.

  • Receipt of the drawings and estimate will conclude Phase 2.

Phase 3

1. Review, Revise, and Remit
1.  Review, Revise, and Remit

  • After you receive your estimate, please reach out to Winmark and work through the estimate with them on any adjustments that may need to be made. They will also explain to you what certain items are and if they are necessary for your specific store. Feel free to contact your account manager as well if you have further questions. After you discuss with Winmark and come up with the revisions you would like to make, please import the estimate into a PDF editor or print it out to mark up your desired revisions.

2. Estimate Confirmation

  • Once you have completed the revised the estimate with all of your desired changes, please send it to info@d-e.net or directly back to your account manager. Your account manager will then update the estimate with adjusted freight costs and any other necessary changes. They will then send you the estimate back for final confirmation in an email that will also contain a link to our “Estimate Confirmation” form.

3. Delivery Schedule

  • After submitting the Estimate Confirmation form, your account manager will reach out to you to discuss payment. You will also receive an email that will contain a link to our “Delivery Schedule” form. This form will have you fill out the dates that you would like your items to arrive. The lead times and transit times will be listed below each category.

4. Receiving Shipments

  • When the shipments arrive, you and/or your contractor should plan on having a few extra hands to help with unloading the truck, as all items will need to be directly unloaded from the pallets.

  • If you have any complications with your order (missing items, damages, etc.), please reach out to us immediately for assistance and be sure to make notes on the delivery receipt before signing it.

  • Receipt of all shipments will conclude Phase 3 and the Design Process.

Design Process Guide

Feel free to download our Design Process Guide to get a detailed look at what each specific step entails.

Click Here to Download

Get an Overview

To get started on our Design Process we will first have you fill out our Customer Contact Form

Customer Contact Form
Completing the Customer Contact Form will act as the beginning of the Design Process. You will then be walked through each step via email updates as you move along. This process will also be the same for stores that are relocating.
homepage illustration

Let's Design Your Store Together

Schedule a free virtual consultation with our design team to begin planning your project.

GET STARTED

Contact Us

We are here to help!

Our specialists are here to provide the information and guidance you need. Contact us for assistance with products, design services, or project planning.

Email Us designed_environments@d-e.net Call us 1-320-235-0852

Hours of Operations

Monday - Friday 8:00am - 5:00pm CST
Saturday and Sunday: Closed